Upcycling Old Glass Jars into Elegant Textured Vases

Approximately 80% of the glass items sent to landfills in the United States could be successfully repurposed or recycled into high-end home decor, yet most people see a discarded pickle jar as nothing more than trash. This massive gap between "waste" and "potential" is where the most sophisticated interior design happens. Transforming a standard, utilitarian glass vessel into a sculptural, textured vase is a simple matter of altering its surface tension and light reflectivity. By applying specific layering techniques, you can move a piece from the pantry to a high-end mantel or a minimalist dining table.
The Fundamentals of Glass Upcycling
Before applying any medium, you must understand the surface of your vessel. Glass is non-porous, which means standard paints and adhesives often struggle to bond with the surface. To ensure your textured vase doesn't flake or peel after one week, the preparation phase is non-negotiable. You are not just decorating; you are engineering a new surface. Whether you are using a heavy Bolognese jar or a slender olive oil bottle, the structural integrity of the glass remains the same, but the tactile experience will change based on the materials you choose to adhere to it.
For a professional finish, you will need a curated kit of supplies. Avoid generic craft stores if possible; instead, look for high-quality architectural or hardware-store materials that offer better durability. A high-quality matte acrylic paint, a heavy-body modeling paste, and a variety of organic textures will yield much more sophisticated results than standard glitter or thin watercolors.
Essential Tool Kit
- The Vessel: Large glass jars (Kerr or Mason jars work well for volume, while wine or spirit bottles work for height).
- The Adhesive: Matte medium or a high-quality PVA glue (such as Elmer’s School Glue, but for professional results, look for Mod Podge Matte).
- The Texture: Modeling paste, joint compound, or even fine sand.
- The Color: Acrylic paints in muted, earth-toned palettes (think terracotta, sage, or sand).
- Application Tools: Silicone spatulas, stiff-bristled brushes, and a sea sponge.
- The Finisher: A matte spray sealant to prevent dust accumulation.
Technique 1: The Sculptural Modeling Paste Method
This method is designed to create a "stone" or "ceramic" look that mimics high-end boutique finds from stores like West Elm or Anthropologie. This technique relies on building physical depth on the surface of the glass to catch the light and create shadows.
Step 1: Degreasing the Surface. Wipe the entire exterior of your jar with a cotton pad soaked in Isopropyl Alcohol (70% concentration). This removes any residual oils or labels that would prevent the paste from adhering. Even a fingerprint can cause a failure in the bond if you are working with heavy textures.
Step 2: The Base Coat. Apply a thin, even layer of acrylic paint to the glass. I recommend a neutral color like "Oatmeal" or "Stone." This provides a solid color foundation so that if the texture thins in certain areas, the clear glass doesn't peek through. Let this dry completely—approximately 20 minutes.
Step 3: Applying the Texture. Using a silicone spatula, scoop a generous amount of modeling paste or lightweight joint compound. Apply it to the jar in irregular, organic strokes. Do not aim for perfection; the goal is a "wabi-sabi" aesthetic where the imperfections create character. For a more rugged, volcanic look, mix a tablespoon of coarse sea salt or fine sand into your paste before application.
Step 4: Creating Ridges. While the paste is still wet, use a stiff-bristled brush to create vertical or horizontal striations. This mimics the look of hand-thrown pottery. If you want a more subtle, "linen" texture, use a sea sponge to dab the paste lightly across the surface rather than spreading it thick.
Step 5: The Final Color Wash. Once the paste is fully cured (usually 12–24 hours), do not just paint over it. Instead, use a "dry brush" technique. Dip a brush into a darker shade of your base color, wipe most of it off onto a paper towel, and lightly graze the high points of the texture. This creates depth and makes the vase look like an authentic piece of stoneware. This technique is a great way to create a high-end look with thrifted accents by pairing the textured ceramic with a metallic element.
Technique 2: The Minimalist Linen and Gesso Method
If you prefer a softer, more organic aesthetic—perfect for a Scandi-inspired bedroom or a bright sunroom—the linen method is superior. This technique uses fabric to create a tactile, woven appearance that feels much more expensive than it actually is.
Step 1: Preparing the Fabric. Instead of expensive textured wallpaper, use scrap pieces of linen or thin cotton muslin. You can often find these in the remnants bin at fabric stores. Tear the fabric into irregular strips rather than cutting them with scissors; the frayed edges will look much more natural once applied.
Step 2: The Adhesive Layer. Apply a thick layer of matte medium or heavy-duty decoupage glue to one section of the jar. Wrap a strip of the fabric around the jar, pressing it firmly into the glue to eliminate air bubbles. Work in small sections to ensure the fabric stays taut.
Step 3: Smoothing and Layering. Once the fabric is adhered, use a flat brush to smooth out any wrinkles. If you want a layered, dimensional look, apply a second layer of fabric over the first, but offset the direction. This creates a complex, woven texture that mimics high-end sculptural art.
Step 4: The Paint Seal. Once the fabric is dry, the material will look somewhat stark. To integrate it with your decor, paint the fabric with a very diluted acrylic paint (a "wash"). This allows the texture of the weave to show through while adding a sophisticated tint. This is an excellent way to refresh your space for spring by using soft, breathable textures and light colors.
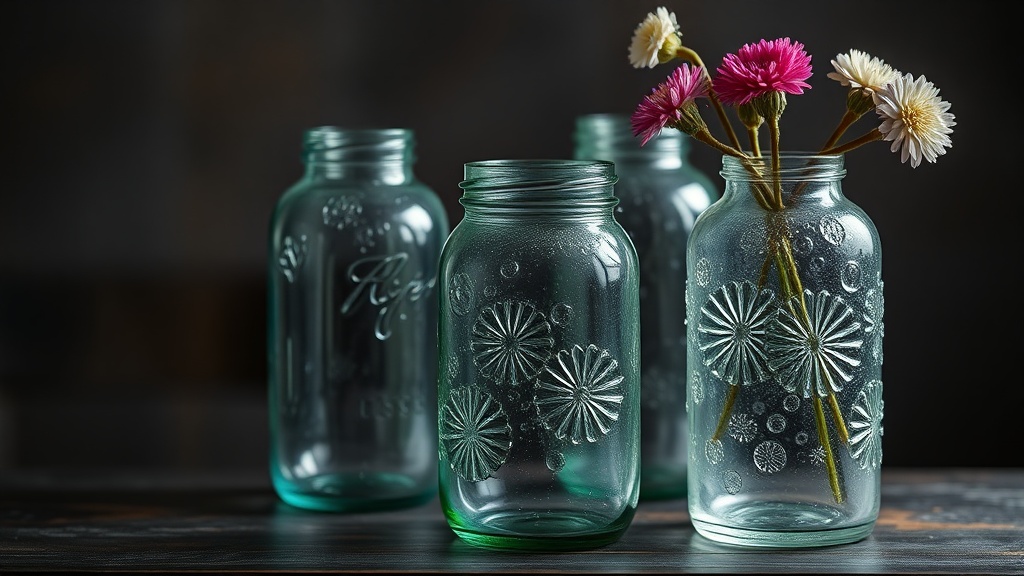
Technique 3: The Frosted Etched Glass Method
For those who prefer a modern, sleek aesthetic, you can use glass frosting techniques to create a sophisticated, translucent vessel. This is ideal for displaying single stems of dried eucalyptus or pampas grass.
Step 1: The Stencil or Freehand Approach. You can use a glass etching cream (like Armour Etch) for a permanent, professional-grade frosted look, or a frosted glass spray paint for a more temporary, budget-friendly option. If using spray paint, ensure you are working in a well-ventilated area, such as a garage or outdoors.
Step 2: Creating Patterns. If using etching cream, use painter's tape to create geometric shapes or organic leaf silhouettes on the glass. Apply the cream over the tape, wait the directed amount of time (usually 15-30 minutes), and then rinse. The result is a permanent, etched design that looks like custom-made glassware.
Step 3: The Matte Finish. If you chose the spray paint route, apply several very thin coats. If you apply it too thick, the paint will run and create unsightly drips. The goal is a uniform, soft-focus finish that obscures the contents of the jar while still allowing light to pass through.
Professional Tips for Styling Your New Vases
A beautiful vase is only as good as what is inside it. Once your upcycled glass is complete, the styling phase determines whether it looks like a "craft project" or a "designer piece."
"The secret to high-end styling is restraint. A textured, heavy-bodied vase should be paired with a singular, architectural element—like a single dried branch or a single Monstera leaf—rather than a crowded bouquet of colorful flowers."
For Textured/Stone Vases: Pair these with dried botanicals. Dried Lunaria (Honesty) or bleached Ruscus provides a structural, monochromatic look that complements the heavy texture of the modeling paste. Avoid bright, colorful flowers, as they will compete with the sophisticated surface of the vase.
For Linen/Fabric Vases: These work beautifully with fresh, soft-colored blooms. Think white tulips, pale pink peonies, or even simple green stems. The softness of the fabric and the freshness of the flowers create a cohesive, organic feel.
For Frosted/Minimalist Vases: Use these to highlight movement. A single, long stem of Eucalyptus or a branch of Cherry Blossoms works best. The translucency of the frosted glass will catch the light, making the botanical element appear as if it is floating in a soft haze.
By treating every discarded jar as a canvas rather than waste, you can build a collection of home accents that look curated and expensive. Remember, the goal is to manipulate light, shadow, and texture to elevate the mundane into the extraordinary.
Steps
- 1
Clean and Prep the Glass
- 2
Apply Texture with Baking Soda or Plaster
- 3
Paint for a High-End Finish
- 4
Style with Dried Florals