$33.26 Thrifted Gallery Wall That Looks Like a $300 Curation (7 Frames, 1 Afternoon)

$33.26 Thrifted Gallery Wall That Looks Like a $300 Curation (7 Frames, 1 Afternoon)
I've been staring at the blank wall above my couch for three months. You know that wall — the one you keep saying you'll "get to eventually" while it silently judges you every time you sit down with your coffee.
Last Saturday I finally did something about it. Seven thrifted frames, one can of spray paint I already owned, and about two hours of layout time on my living room floor.
Total cost: $33.26
And honestly? People keep asking me where I "got it done." As if I hired someone. I did not.
What I actually bought (Nashville prices, March 2026)
| Item | Source | Price |
|---|---|---|
| 3 wood frames, various sizes | Goodwill (Nolensville Rd) | $2.99 + $4.49 + $2.49 |
| 2 gold-tone frames | Goodwill | $1.99 + $3.49 |
| 1 large white frame (16x20) | Habitat ReStore | $6.99 |
| 1 small oval frame | Estate sale box lot | $0.50 |
| Kraft paper roll (for templates) | Dollar Tree | $1.25 |
| Command strips (3 packs) | Dollar Tree | $3.75 |
| Scrapbook paper pack (for art) | Dollar Tree | $1.25 |
| Cardstock sampler (neutrals) | Dollar Tree | $1.25 |
| White spray paint | Already owned | $0.00 |
Subtotal: $30.44 + $2.82 TN sales tax = $33.26
If you need to buy spray paint, add about $5 from Walmart. Still under $40.
My honest opinion on gallery walls
Most gallery wall tutorials make me want to scream. They show you fifteen matching frames from Target at $12.99 each and call it "budget." That's $195 in frames alone. That is not budget. That is a regular wall of frames that costs regular money.
A real budget gallery wall uses mismatched frames on purpose. The mix is what makes it look curated instead of catalog. Interior design school taught me that — visual tension between different frame styles creates more interest than perfect matching ever could.
How to pick frames at the thrift store (my actual process)
I don't grab every frame I see. Here's what I'm looking for:
- Shape variety. At minimum: one round or oval, one square, one rectangle. If they're all the same shape, it looks like a clearance display at HomeGoods.
- Size range. You need at least one anchor piece (16x20 or bigger) and a couple of small ones (5x7 or under). The size contrast is what makes the arrangement feel intentional.
- Condition that paint can fix. Scratches, outdated gold, wrong color — all fixable. Warped wood, broken corners, missing glass — skip those.
- Ignore the art inside. I literally never look at the prints that come in thrift store frames. I'm buying the frame, not the motivational poster from 2008.
Skip anything with non-removable matting that's water-stained. That stain bleeds through and you'll see it forever.
The spray paint decision
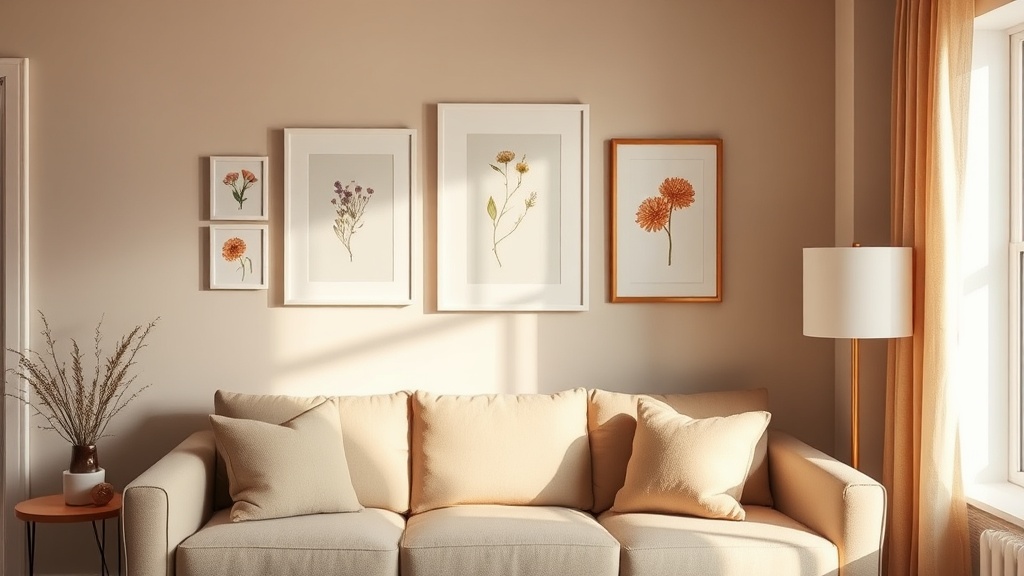
I painted five of my seven frames matte white. Left the two gold-tone ones as-is because they had that warm, slightly tarnished look that reads "vintage" instead of "old."
My rule: pick two finishes max. White + gold. Black + natural wood. White + black. More than two finishes and it starts looking like a flea market display instead of intentional design.
One coat of primer, two coats of color. Let each coat dry fully — I know you want to rush this. Don't. Tacky spray paint will take the finish right off when you handle the frames later.
What to put IN the frames (no printer required)
This is where people overthink it. You do not need to print professional photographs or buy art prints from Etsy. Here's what I used:
- Scrapbook paper with patterns — the Dollar Tree pack had a terracotta geometric that looks like a $40 print from Society6 behind glass
- Cut-out pages from old books — I had a water-damaged vintage cookbook. Tore out a page with a hand-drawn pie illustration. It's now my favorite piece on the wall.
- Cardstock in solid neutrals — a plain piece of cream cardstock in a frame with a wide mat looks like minimalist art. I'm not kidding. It works.
- One actual photo — I printed a single black-and-white photo at Walgreens for $0.35 (not included in the budget because I used a free print coupon). It's a picture of my grandmother's kitchen table.
- Pressed flowers — I had dried lavender from a farmers market bouquet. Taped the stems to cardstock and framed them. Cost: literally nothing.
- Fabric scraps — a piece of linen cut to size fills a frame beautifully if you pull it taut
The trick is keeping the color palette tight. Mine is cream, terracotta, sage green, and gold. Everything inside the frames stays within those four colors.
Layout method (the kraft paper trick that actually works)
Do NOT eyeball your gallery wall layout. I've done it. It results in seventeen unnecessary nail holes and the kind of frustration that makes you want to sell your house.
Here's the method:
- Trace each frame onto kraft paper (or newspaper, or grocery bags — any paper works). Cut out each shape.
- Arrange the paper cutouts on the floor first. Move them around until you like the spacing. I spent about 40 minutes on this. It's the most important step.
- My spacing rule: 2-3 inches between frames. Closer than that feels cramped. More than 4 inches and they stop reading as a group.
- Tape the paper templates to the wall with painter's tape. Stand back. Look at it from where you actually sit. Not from two feet away — from your couch, from the kitchen, from the hallway.
- Live with the paper on the wall for a day if you can. I left mine up overnight. Changed two positions the next morning because the oval frame was too high.
- Mark the hanging point through the paper, then remove and hang the real frames.
This method uses zero math. I'm not measuring center points or calculating spacing with a level. The paper does the thinking for you.
Hanging without holes (renter-friendly)
Command strips. That's it. That's the section.
The large frame needed two sets of large Command strips (holds up to 16 lbs). Everything else used medium strips. Press firmly for 30 seconds per strip — actually count to 30, don't just mash it on the wall and hope.
Wait one hour before hanging the frame. The adhesive needs time. I know the package says "ready to use immediately" but I've had frames crash at 2 AM because I was impatient. Learn from my suffering.
The finished result
Seven frames. Four colors. Two frame finishes. One very happy Tessa.
The whole arrangement spans about 4 feet wide by 3 feet tall above my couch. It fills the wall without overwhelming the room, and it has that "collected over time" look that expensive gallery walls try to fake.
My favorite detail: the oval estate sale frame with pressed lavender inside. It cost fifty cents and it's the piece everyone comments on.
What I'd do differently
Honestly? Not much. But if I did this again:
- I'd grab a couple more small frames to fill one gap in the lower right that bugs me
- I'd use actual picture wire on the large frame instead of Command strips (it's slightly tilting and I'm pretending not to notice)
- I'd spend more time at estate sales — that oval frame was from a $5 box lot that had six frames in it. Best deal of the whole project
The real cost breakdown
| Category | Amount |
|---|---|
| Frames (7 total) | $22.94 |
| Hanging hardware | $3.75 |
| Art supplies | $2.50 |
| Paper for templates | $1.25 |
| Tax (9.25% TN) | $2.82 |
| TOTAL | $33.26 |
Under thirty-five bucks for a gallery wall that makes my living room look like it belongs to someone who has their life together.
Spoiler: I do not have my life together. But my walls don't need to know that.